
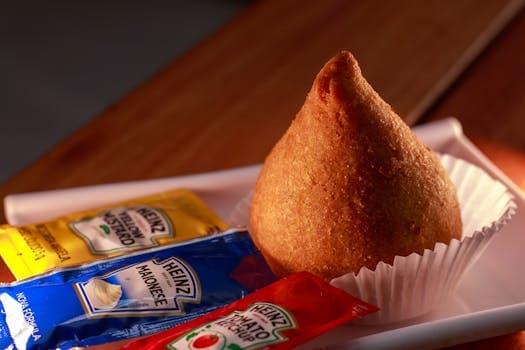
Coxinha (Brazilian Chicken Croquettes)
Teardrop-shaped chicken croquettes with cream cheese filling, coated in golden breadcrumbs — Brazil's favorite snack.
About This Recipe
Coxinha — Portuguese for 'little thigh' — is Brazil's most beloved salgado (savory snack), a teardrop-shaped croquette filled with shredded seasoned chicken and creamy catupiry (Brazilian cream cheese), encased in a smooth dough of potato and flour, then breaded and deep-fried to a shatteringly golden crunch. They are sold at every padaria (bakery), lanchonete (snack bar), street festival and birthday party from Belém to Porto Alegre. The origin story is appropriately Brazilian — the food of necessity made elegant. The shape mimics a chicken drumstick (coxinha = little thigh), and according to Brazilian culinary lore, they were created in the 19th century for a São Paulo royal who demanded chicken thighs but received only the neck. The cook made do, grinding the neck meat, wrapping it in dough and forming the thigh shape. Whether true or not, the story captures the Brazilian spirit of improvisation and creativity. Making coxinha at home is a weekend project worth every moment: the dough comes together quickly, the filling is simple and fragrant with catupiry and aromatics, and the final frying produces something so warm and crispy that people will eat them straight from the pan with burned fingertips and zero regrets. Serve with malagueta hot sauce for the full Brazilian experience.
Ingredients
Serves 20
- 1 lbchicken breasts or thighs(cooked and finely shredded)
- 8 ozcatupiry or cream cheese
- 1 smallonion(finely diced)
- 3 clovesgarlic(minced)
- 2 tbspvegetable oil
- ½ cuptomato paste
- ¼ cupfresh parsley(finely chopped)
- 1 tspsalt
- 2 cupschicken broth
- 2 cupsall-purpose flour
- 2 cupswater
- 1 tbspbutter
- ½ tspsalt(for dough)
- 2 largeeggs(beaten, for breading)
- 2 cupsfine breadcrumbs
- 4 cupsvegetable oil(for frying)
Instructions
- 1
Make the chicken filling
Sauté onion and garlic in oil until soft. Add tomato paste, cook 2 minutes. Add shredded chicken and parsley. Season well. Remove from heat. Stir in catupiry until combined. Cool.
- 2
Make the dough
Bring broth, water, butter and salt to a boil. Add all the flour at once and stir vigorously with a wooden spoon until dough pulls away from the sides. Cool until handleable (warm, not hot).
The dough should be smooth and pliable, not sticky. If too sticky, add flour 1 tablespoon at a time.
- 3
Shape the coxinha
Take a golf ball-sized piece of dough, flatten in your palm. Place a teaspoon of filling in the center. Close the dough around the filling, pinching to seal. Shape into a teardrop (wide at bottom, pointed at top — like a drumstick).
Pinch the seam completely shut — any gap will allow oil to leak in during frying.
- 4
Bread and fry
Dip each coxinha in beaten egg, then roll in breadcrumbs. Fry at 350°F in batches of 4–5 for 3–4 minutes until deeply golden. Drain on paper towels.
Did you make this?
Rate it and help other cooks find the recipes that actually work.
One tap to sign in, and we'll save the rating you just picked.
Everything you need to plan your week — free
- Meal calendar
- Grocery list
- AI recipe ideas
Track what you eat
Snap your meal to log calories and macros, run fasting timers and track water in the free SnapCal app.
Pro Tips
- →
The dough must be kneaded until very smooth — rough dough tears during shaping.
- →
Catupiry cream cheese is the authentic filling — Kraft cream cheese is a good substitute.
- →
Freeze uncooked coxinha on a sheet pan, then bag and freeze up to 3 months. Fry from frozen, adding 2 extra minutes.
Variations
- •
Coxinha de Palmito: filled with heart of palm and catupiry for a vegetarian version.
- •
Coxinha Assada (Baked): brush with egg wash and bake at 400°F for 20 minutes — not authentic but much lighter.
Storage
Cooked coxinha keep refrigerated 2 days; reheat in a 375°F oven for 10 minutes. Uncooked coxinha freeze up to 3 months.
History & Origin
Coxinha's origin is attributed to a cook on the farm of Countess Ricarda de Alencastro in São Paulo in the 19th century, who improvised a chicken drumstick substitute for a prince who only ate chicken thighs. The story gave the snack its name and shape. By the 20th century, coxinha had spread to every padaria in Brazil and became the country's defining salgado (savory snack).
Frequently Asked Questions
What is catupiry and what can I substitute?
Catupiry is a mild, creamy Brazilian cream cheese with a distinctly smooth, slightly tangy character. Philadelphia cream cheese is the most common substitute. The texture is similar though the flavor differs slightly.
Why is my coxinha dough too hard?
The flour-to-liquid ratio or cooking time may have been off. Add warm water 1 tablespoon at a time and knead until pliable. The dough should have the consistency of play-dough.
Can I air-fry coxinha?
Yes — spray with oil and air-fry at 375°F for 12–15 minutes, turning halfway. The result is slightly drier than deep-fried but still very good.
Nutrition Facts
Per serving (250g / 8.8 oz) · 20 servings total
Time Summary
Have Questions?
Ask our AI cooking assistant anything about this recipe — substitutions, techniques, scaling.
Chat with AI Chef →Featured in Guides
This recipe is featured in the following curated guides:
More Brazilian Recipes
You Might Also Like
Similar dishes from other cuisines around the world.
Browse by Ingredient
More recipes built around the same core ingredients.
Free Kitchen Tools
Calculators and converters that pair with this page — no signup needed.
Put This Into a Plan
Schedule it, shop for it, and track what you already have.
Read Next
Longer reads that go deeper on the ideas behind this dish.
Community
Join the conversation
Sign in to leave a comment and save your favourite recipes